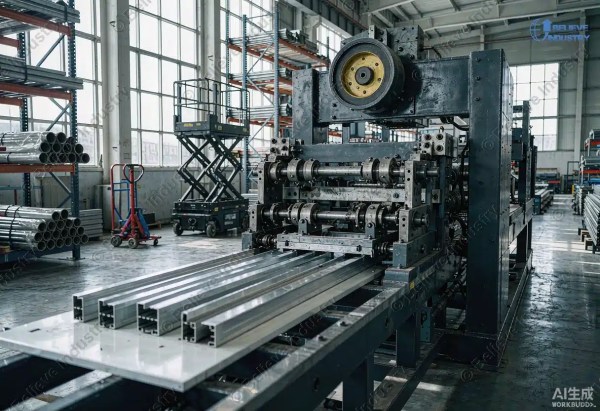










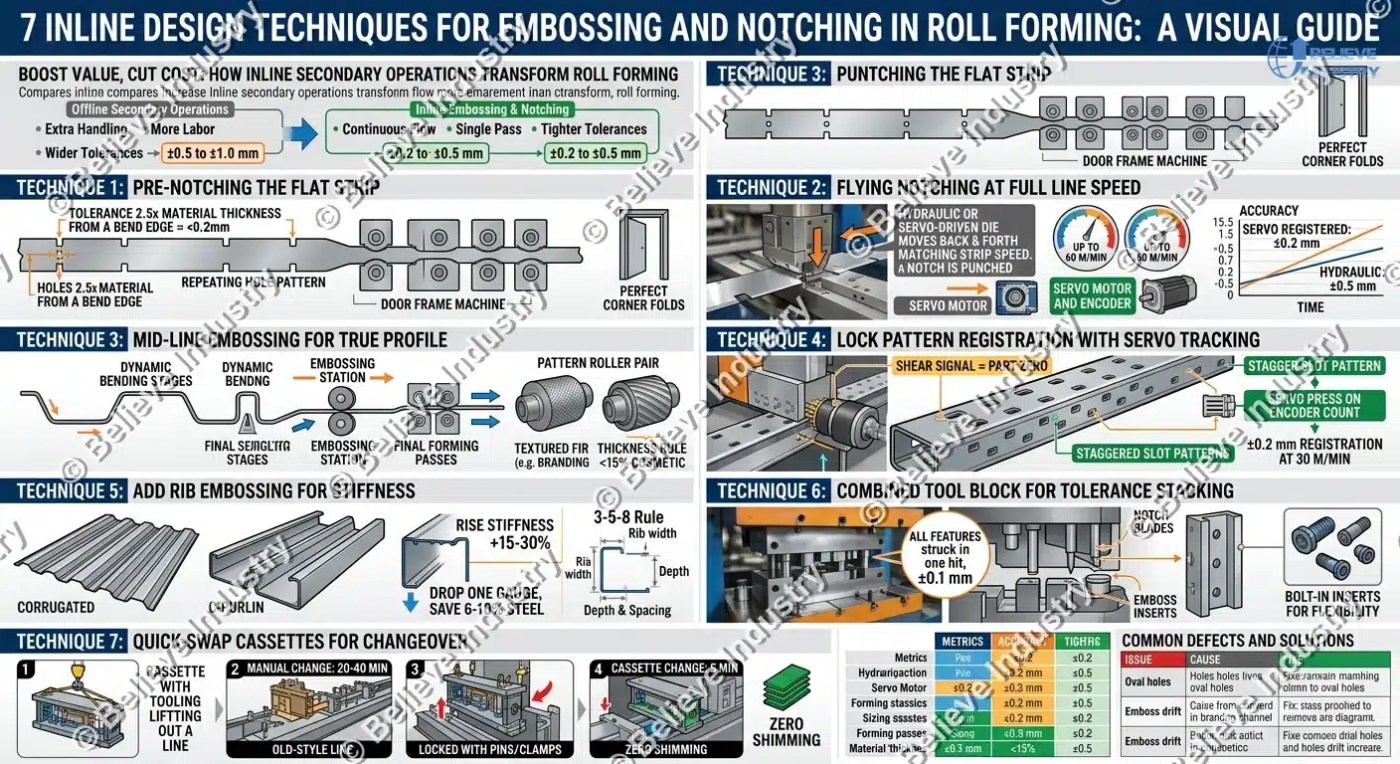
Embossing and notching in roll forming turns a plain profile into a finished part on one line. Instead of running blanks through a second factory cell, the machine stamps patterns, ribs, and cutouts while the strip moves. Done right, this removes handling steps, cuts labor, and locks in tolerances that offline work cannot match.
The catch is design. An emboss placed in the wrong station distorts the profile. A notch punched after forming tears the leg. This guide breaks down 7 inline design techniques for embossing and notching in roll forming, with the speeds, depths, and tolerances that decide whether the line makes money or scrap.
What Inline Embossing and Notching Actually Mean
Embossing is the controlled deformation of the strip surface to create a raised or recessed pattern. Typical emboss depth runs 0.3 to 1.5 mm on steel from 0.4 to 3.0 mm thick. Notching is the removal of material, usually a rectangular or shaped cutout, so the finished profile can fold, clip, or fasten to another part.
Both operations can run inline or offline. Inline means the operation happens on the roll forming line itself, before or between forming stations. Offline means parts are cut first, then handled on a separate press. The difference shows up fast in unit cost.
These are the highest-value δευτερεύουσες λειτουργίες στη γραμμή διαμόρφωσης κυλίνδρων because most profiles need at least one hole, notch, or pattern to function as a part.
| Παράγοντας | Inline Embossing and Notching | Offline Secondary Operations |
|---|---|---|
| Added line cost | 15 to 40 percent | 10 to 20 percent of press cell cost |
| Cycle integration | Continuous, single pass | Batch, extra handling |
| Positional tolerance | ±0.2 to ±0.5 mm | ±0.5 to ±1.0 mm |
| Typical line speed | 10 to 60 m/min | Line speed unchanged, extra queue |
| Labor per part | Lowest | 1 extra operator per shift |
| Καλύτερο για | High volume, repeat profiles | Short runs, many hole patterns |
Technique 1: Pre-Notch the Flat Strip Before the First Pass
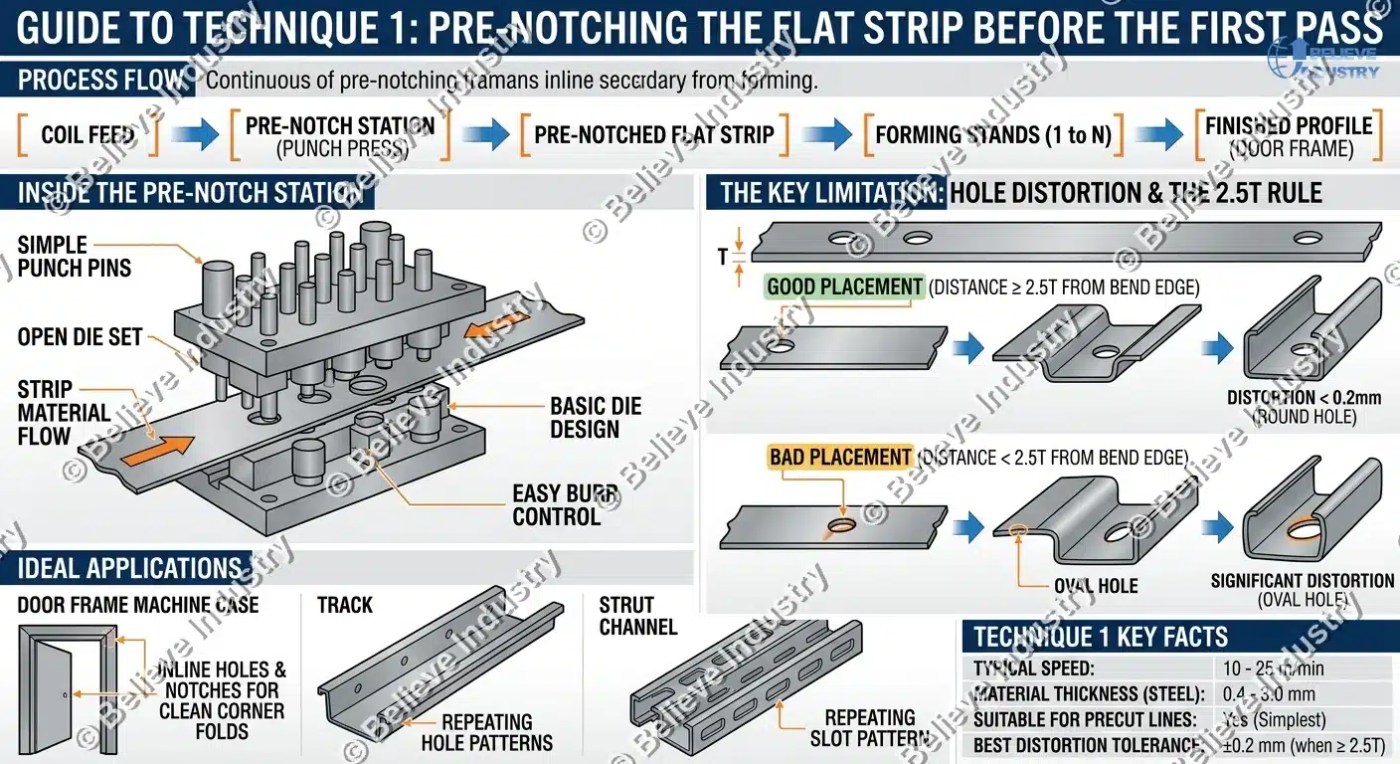
Pre-notching punches holes and notches into the flat strip before it enters the forming stands. On a precut line, this is the simplest and cheapest approach. The tooling sees flat material, so die design stays basic and burr control is easy.
The limitation is hole distortion. Holes placed close to a bend line shift as the material flows. A hole 2.5 times the material thickness or more from the bend edge keeps distortion under 0.2 mm. Closer than that, expect oval holes.
Pre-notching suits door frames, track, and strut channel, where hole patterns repeat every part. The μηχανή σχηματισμού ρολού πλαισίου πόρτας is a classic case, with inline punch holes and notches placed so the frame folds cleanly at the corners. Lines of this type run 10 to 25 m/min.
Technique 2: Use Flying Notching at Full Line Speed
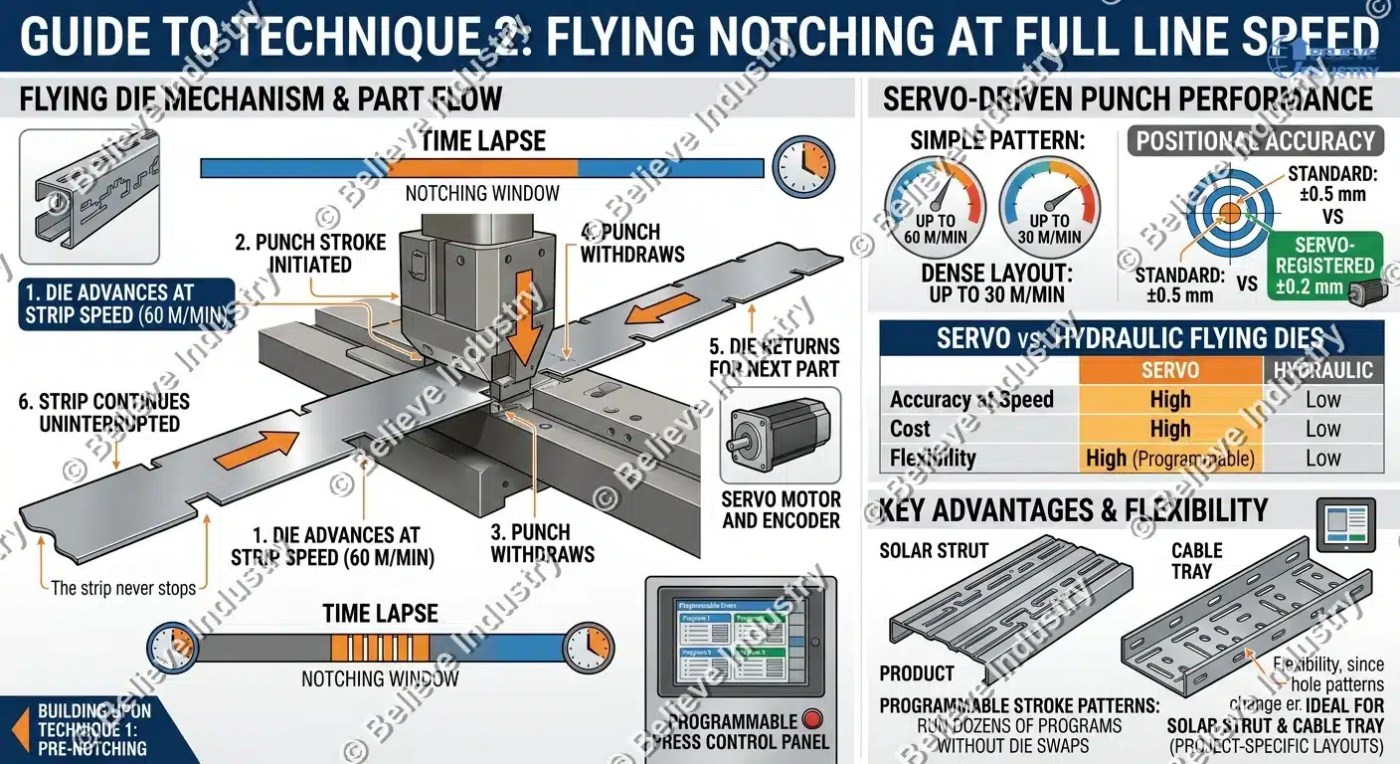
A flying notch die moves with the strip during the stroke, then returns before the next part. The strip never stops. This is the technique that keeps throughput high on coil-fed lines.
Servo-driven flying punches reach 60 m/min on simple patterns and 30 m/min on dense hole layouts. Positional accuracy lands at ±0.5 mm standard, and ±0.2 mm when the die is servo-registered against the encoder count. Hydraulic flying dies cost less but lose accuracy at speed.
Ο punch press for roll forming choice drives this decision. Servo presses give programmable stroke patterns, so one line can run dozens of part programs without die swaps. Solar strut and cable tray lines depend on this flexibility, since hole patterns change per project. The solar strut channel punch solutions guide compares the speed tiers in detail.
Technique 3: Place Embossing Stations Between Forming Passes
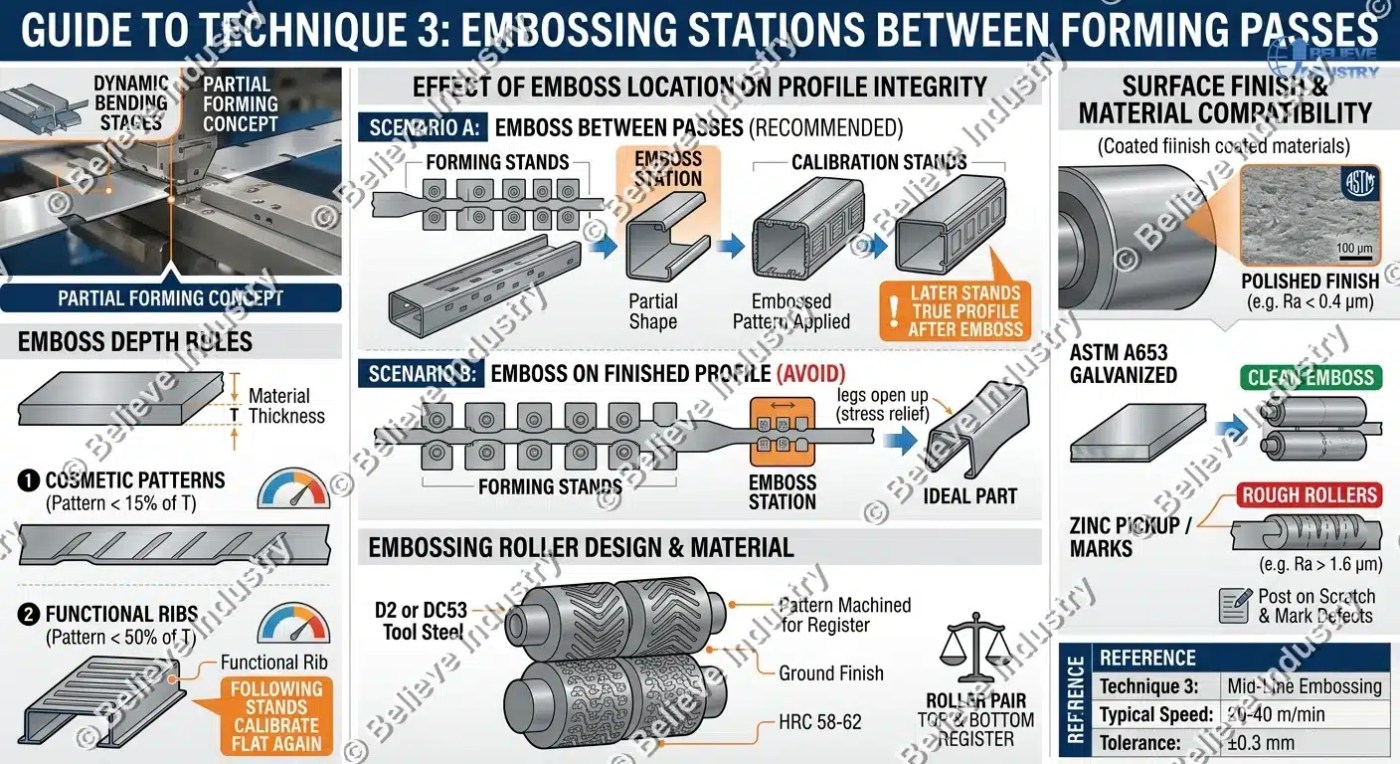
Embossing works best on partially formed strip, not fully finished profile. Placing the emboss station between forming passes lets later stands true the profile after the pattern is stamped. If you emboss the finished section, the pattern relieves stress and the legs open up.
Keep emboss depth under 15 percent of material thickness for cosmetic patterns. Functional ribs can go deeper, up to half the thickness, but the following stands must calibrate the section flat again. Embossing rollers are typically ground from D2 or DC53 tool steel at HRC 58 to 62, with the pattern machined into the roller pair so top and bottom register.
Surface finish matters here. Rough rollers mark coated strip. ASTM A653 galvanized steel embosses cleanly, but the zinc layer needs polished rollers to avoid pickup. Our post on surface scratch and mark defects covers the roller finish rules that protect coated material.
Technique 4: Lock Pattern Registration with Servo Tracking
Pattern registration is the accuracy of the emboss or notch position relative to the cut end and to other features. Poor registration shows up as embosses that drift down the part and holes that miss mating parts in assembly.
Registration is a solved problem when three elements are correct: an encoder on the forming stands, a servo-driven press, and a shear signal that establishes part zero. With all three, emboss-to-hole relationship holds ±0.2 mm at 30 m/min. With a mechanical press and proximity switch, expect ±0.5 mm at best, drifting with line speed.
This is also the technique that makes staggered patterns possible. Strut channel with slot patterns, ladder tray with rung holes, and furring channel with service holes all rely on the press firing on encoder count, not on time. When you specify a line, ask the supplier to state registration tolerance at rated speed, not at crawl speed.

Technique 5: Add Rib Embossing for Stiffness, Not Looks
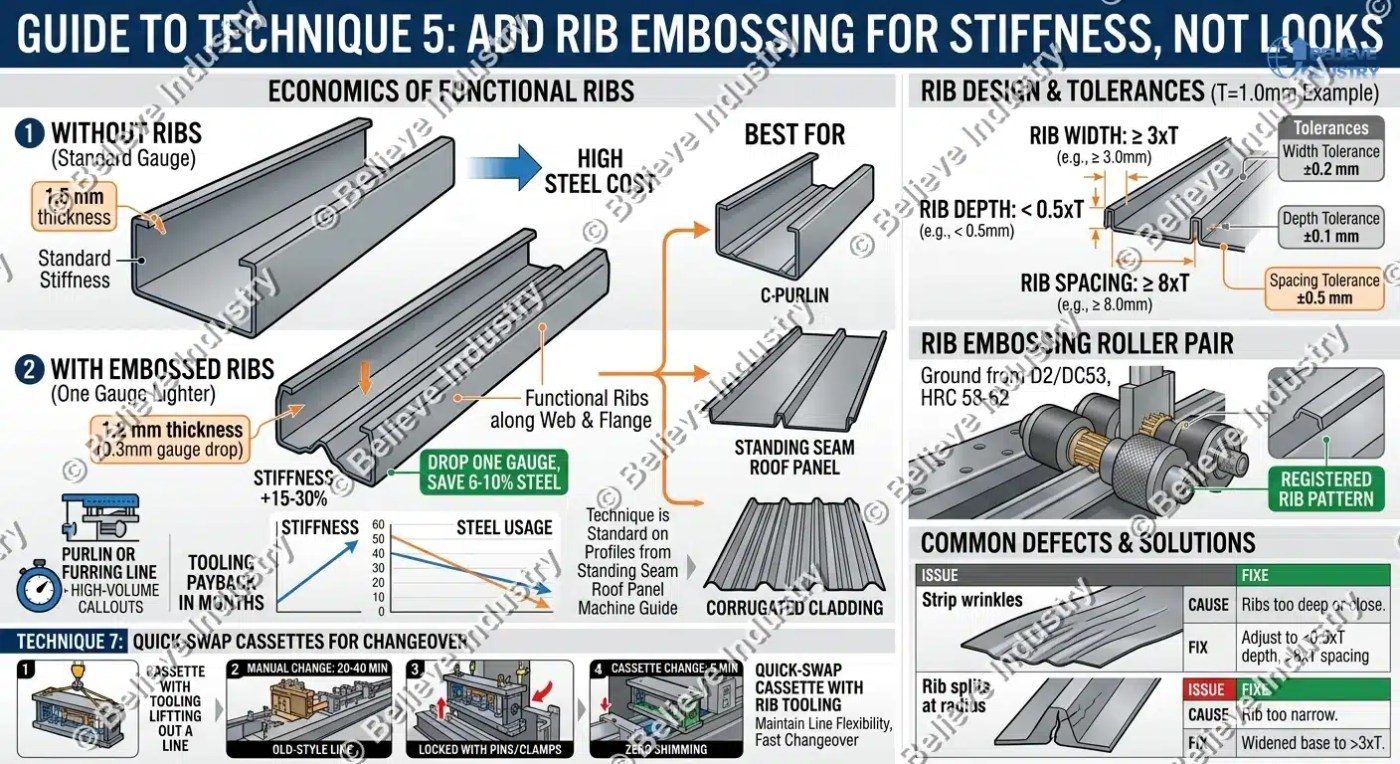
A functional rib changes the economics of the whole part. Embossed ribs running along the web or flange raise section stiffness by 15 to 30 percent without adding material. That lets you drop one gauge, which saves 6 to 10 percent on steel per part. On a high-volume purlin or furring line, that saving outweighs the tooling cost in months.
Rib design follows three rules. Keep the rib at least 3 times the material thickness wide at the base. Keep rib depth under half the thickness for roll-formed sections. Space ribs at least 8 times the thickness apart so the flats between them stay stable. Violate any rule and the strip wrinkles or the rib splits at the radius.
Roofing and cladding profiles use rib embossing the most. Standing seam and corrugated lines gain both stiffness and a visual pattern. The technique is standard on the profiles covered in our standing seam roof panel machine guide.
Technique 6: Combine Punch, Notch, and Emboss in One Tool Block
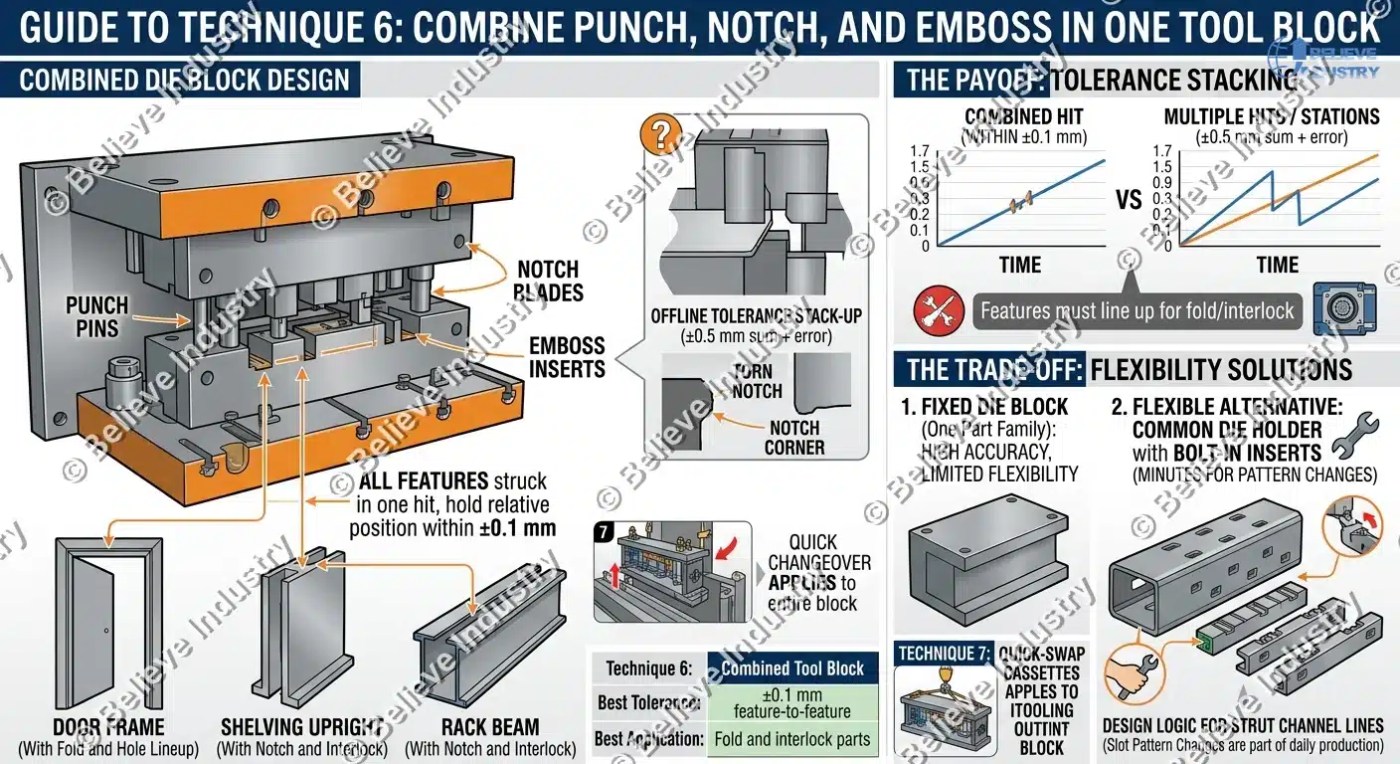
Instead of scattering operations down the line, integrate them. A combined die block carries the punch pins, notch blades, and emboss inserts in one station, with a common die plate and stripper. The whole block drops into the press bed as a unit.
The payoff is tolerance stacking. When all features are struck in one hit, they hold position relative to each other within ±0.1 mm. That matters for parts that fold or interlock, like door frames, shelving uprights, and rack beams, where a notch must line up with a hole on the mating part.
The trade-off is flexibility. One die block fits one part family. High-mix producers should ask for a common die holder with bolt-in inserts instead, so pattern changes take minutes. This is the design logic behind the tool blocks on our μηχανή σχηματισμού κυλίνδρων καναλιού δοκού lines, where slot pattern changes are part of daily production.
Technique 7: Standardize Quick-Swap Cassettes for Changeover
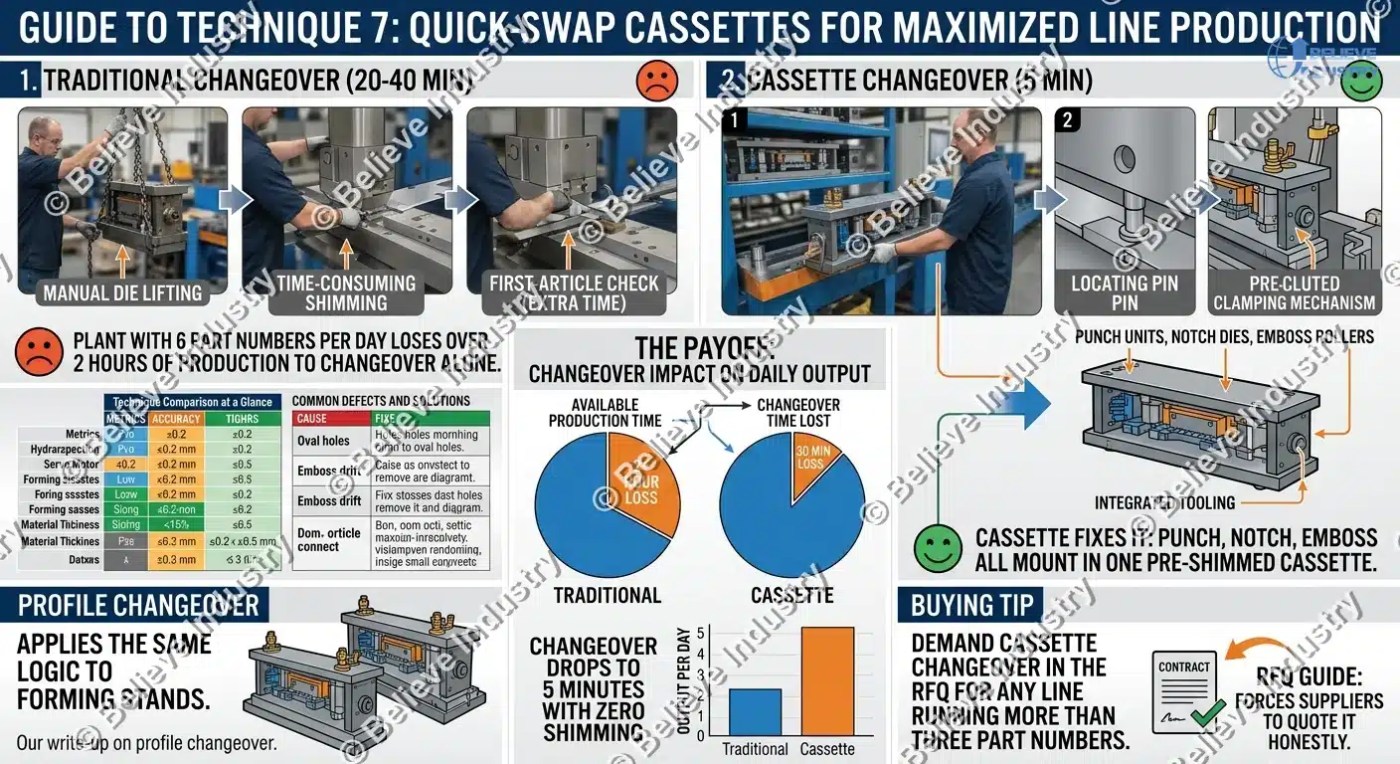
Every technique above dies without fast changeover. Traditional punch and emboss tool changes take 20 to 40 minutes with manual die lifting, shimming, and first-article checks. At that rate, a plant running six part numbers per day loses over two hours of production to changeover alone.
Cassette tooling fixes it. Punch units, notch dies, and emboss rollers mount in pre-shimmed cassettes that lock into the line with locating pins and clamps. Changeover drops to 5 minutes with zero shimming, because each cassette keeps its own registration. Our write-up on αλλαγή προφίλ applies the same logic to forming stands.
Buying tip: demand cassette changeover in the RFQ for any line running more than three part numbers. The roll forming machine RFQ guide lists the specification lines that force suppliers to quote it honestly.
Technique Comparison at a Glance
| Technique | Τυπική ταχύτητα | Best Tolerance | Added Cost | Best Application |
|---|---|---|---|---|
| 1. Pre-notching flat strip | 10 to 25 m/min | ±0,5 χιλ. | Χαμηλός | Precut lines, repeat holes |
| 2. Flying notching | 30 to 60 m/min | ±0.2 to ±0.5 mm | Μέσον | Coil-fed high volume |
| 3. Mid-line embossing | 20 to 40 m/min | ±0,3 χιλ. | Μέσον | Patterns and branding |
| 4. Servo pattern registration | 30 to 60 m/min | ±0,2 χιλ. | Μέσον | Staggered hole layouts |
| 5. Rib embossing | 20 to 40 m/min | ±0,5 χιλ. | Χαμηλός | Purlins, cladding, furring |
| 6. Combined tool block | 15 to 30 m/min | ±0.1 mm feature-to-feature | Medium-high | Fold and interlock parts |
| 7. Quick-swap cassettes | Unchanged | Keeps cassette registration | Low-medium | High-mix production |
Common Defects and How to Fix Them
| Ελάττωμα | Likely Cause | Fix |
|---|---|---|
| Oval holes near bends | Hole too close to bend line | Keep holes 2.5x thickness from bend |
| Emboss drift down the part | Encoder slip or press timing lag | Re-zero encoder, tune servo gain |
| Torn notch corners | Dull blade or excessive clearance | Re-sharpen, set clearance at 8 to 10 percent of thickness |
| Open legs after embossing | Emboss on finished section | Move station before final passes |
| Roller pickup on galvanized | Rough roller finish | Polish to Ra 0.4 um, check coating per ASTM A653 |
| Rib wrinkling | Rib too deep or too narrow | Depth under 0.5x thickness, width over 3x thickness |